
1Overview and prerequisites
With the “MIDbridgeX E-Invoicing” app, Chargebee delegates the generation of your e-invoices to MIDbridgeX. Chargebee hands over every invoice that is ready for billing, MIDbridgeX generates the e-invoice, and Chargebee retrieves it and sends it with the invoice email.
Most of the setup takes place in Chargebee; in MIDbridgeX an access key is generated and a few switches are set – we carry out these steps in MIDbridgeX as administrators together with you; you do not have access to them yourself. Allow 15 to 30 minutes. This guide uses Germany and the Factur-X/ZUGFeRD format as the example.
You will need
- Administrator rights in your Chargebee site
- A Chargebee API key for your site (for the connection in MIDbridgeX)
- Complete company data in MIDbridgeX: name, address, phone, email, tax number or VAT ID, IBAN
Good to know
- Set everything up on your Chargebee test site first, and only then on the live site.
- Labels in Chargebee may change slightly with new Chargebee releases.
- If mandatory data is missing, no e-invoice is generated – the reason is shown directly on the invoice in Chargebee.
2Prepare MIDbridgeX
The settings are located in MIDbridgeX under Settings → General Settings → E-invoicing.
- Set E-invoicing route to Chargebee E-Invoice. Only then do the remaining fields of this section appear.
- Under Access for Chargebee, click Generate key and copy the key right away. It is shown only this once; if you lose it, generate a new one. You do not need to enter an address anywhere – the key alone determines which instance responds.
- Under Link back to Chargebee, select the Chargebee connection – an ordinary REST connection using your site’s API key. If it does not exist yet, create it under Connections first.
- Switch on Report status to Chargebee. Without this report, Chargebee never retrieves the finished e-invoice, and the invoice stays “in progress” there.
- Check Offered formats and Countries (comma separated): the country you activate in Chargebee (here
DE) must be in the list.
3Connect the app in Chargebee
In Chargebee, open Apps in the left-hand menu. If the app is not connected yet, find it via Go to Marketplace; when connecting, Chargebee asks for the API key – enter the key from step 2 there.
- Under Apps connected, click the MIDbridgeX E-Invoicing app (labelled “Sandbox” on the test site).
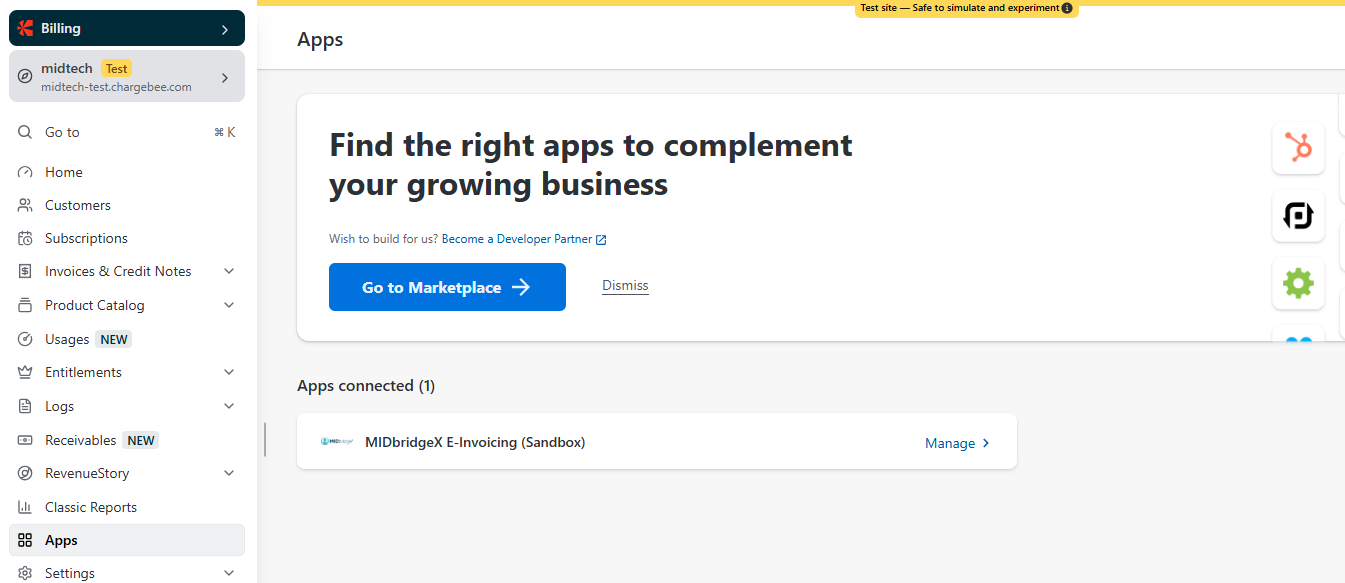
Figure 1 – The connected app under “Apps connected”. - Chargebee confirms that the integration is active. Click Go to E-invoicing.
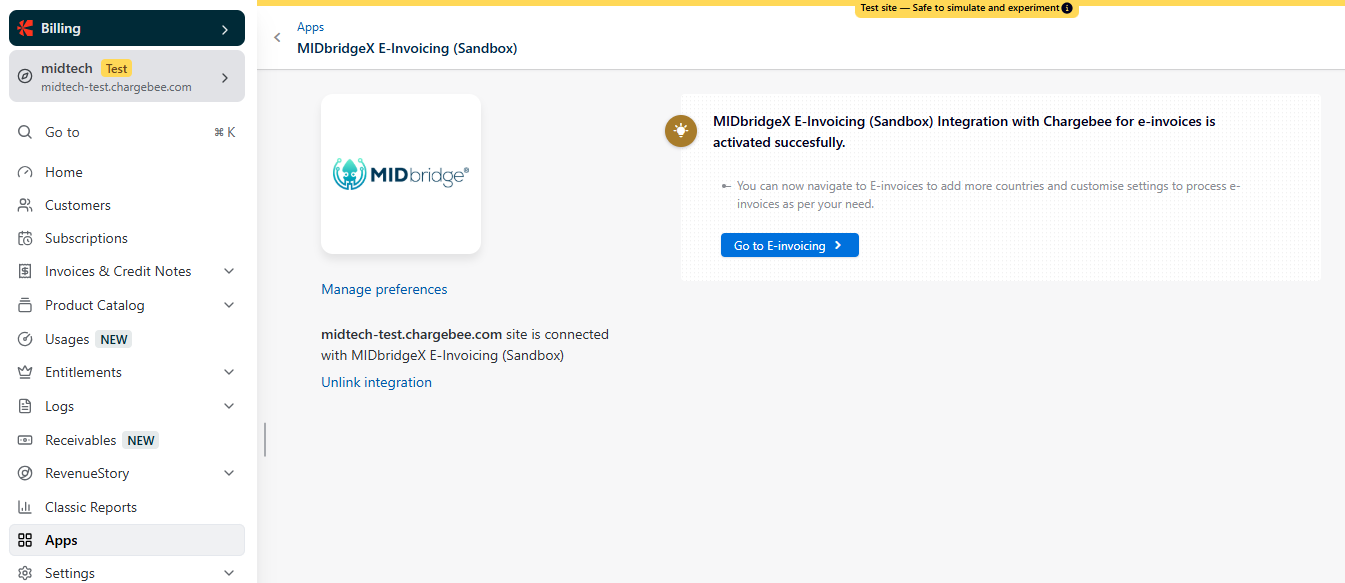
Figure 2 – Integration active; continue to the e-invoicing settings.
4Activate country and format
In Chargebee, e-invoicing is enabled per tax country. For each country you then choose the provider and the format (“model”).
- Click Add Country, search for your country (here Germany), tick it and confirm with Continue.
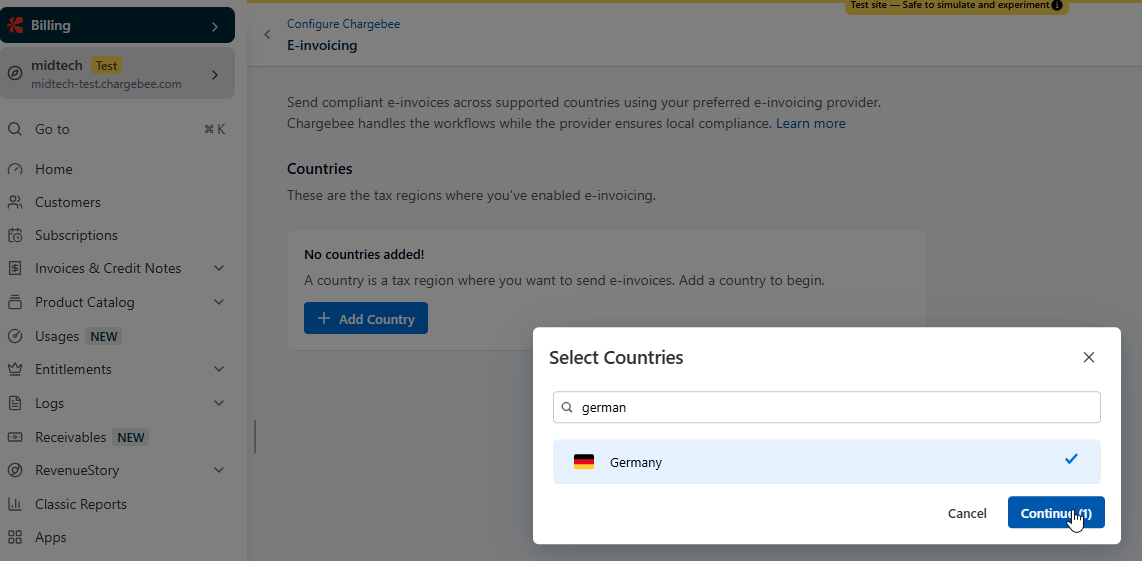
Figure 3 – Adding a country. - Click Manage next to the added country. A country marked Setup pending has no provider and format yet; a fully configured country carries the Active badge.
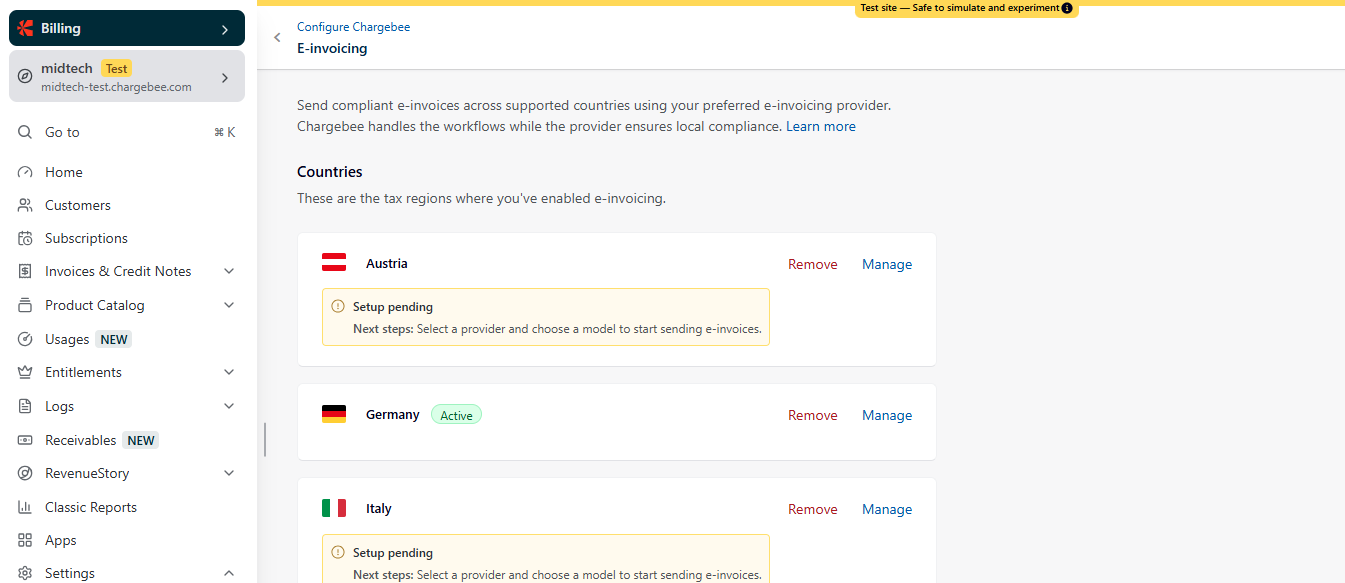
Figure 4 – Country overview: Germany is active, Austria and Italy are still awaiting setup. - Under Models you will see the Zugferd format with the documents zugferd-invoice (invoice) and zugferd-creditnote (credit note). Click the three dots to the right of zugferd-invoice and choose Manage.
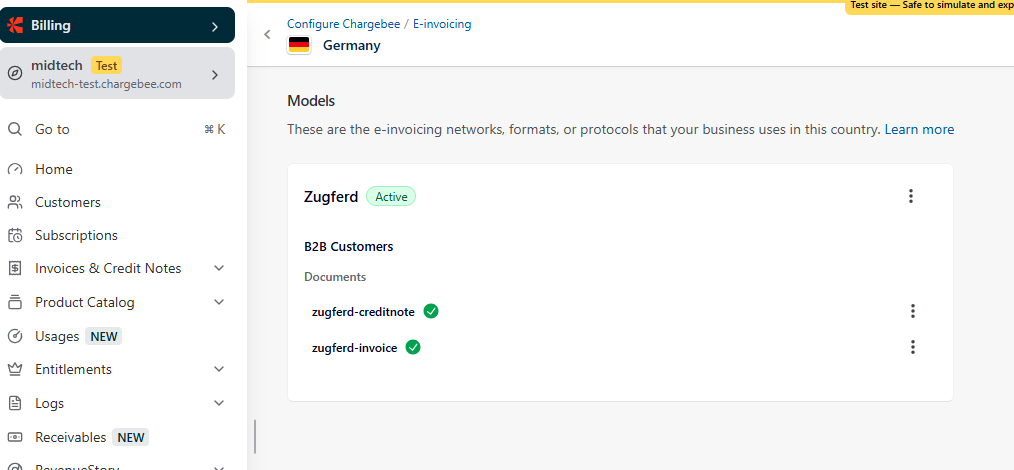
Figure 5 – Zugferd format for B2B customers with the invoice and credit note documents.
5Define the condition
The condition determines for which documents Chargebee requests this e-invoice from MIDbridgeX.
- Set up the condition as shown and click Save and exit:
Field Operator Value WHEN Taxable Address Country equals DE AND Document Type equals Invoice 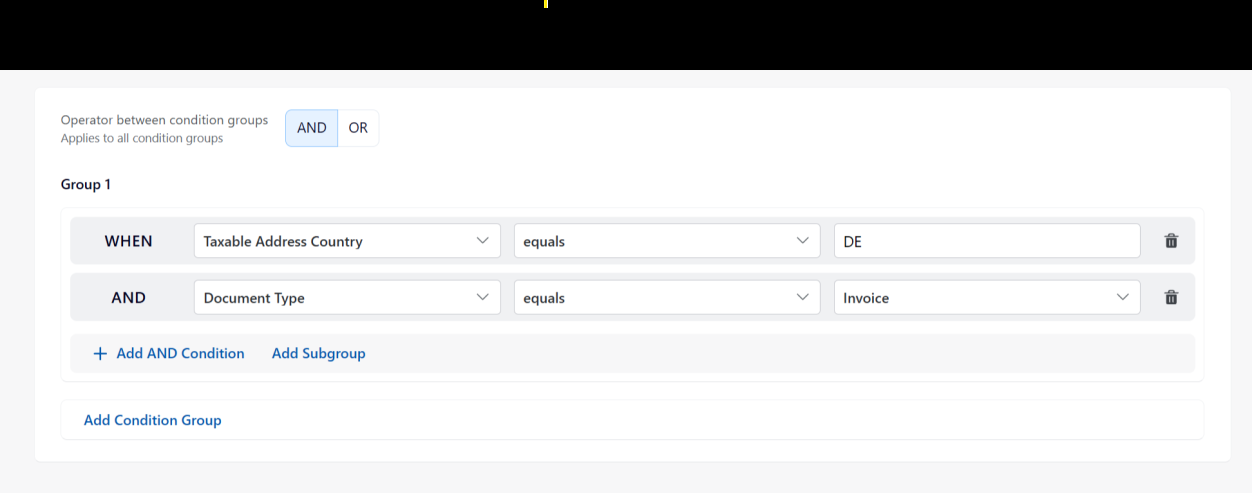
Figure 6 – Condition for zugferd-invoice: tax country Germany and document type invoice.
6Per-format settings in MIDbridgeX
Back in MIDbridgeX under Settings → General Settings → E-invoicing, the Per format block defines what happens after generation. For this setup:
| Per format | Factur-X / ZUGFeRD | XRechnung | Peppol BIS Billing 3.0 |
|---|---|---|---|
| Chargebee PDF as basis | off | off | off |
| Also send Chargebee PDF to DATEV | off | off | off |
| Trigger sending in Chargebee | on | on | on |
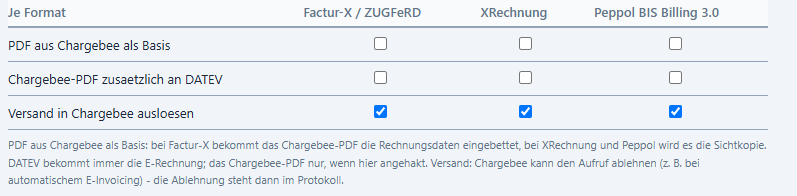
- Chargebee PDF as basis off: MIDbridgeX renders the PDF in its own layout from the document designer. When switched on, Factur-X embeds the invoice data into your usual Chargebee PDF instead.
- Also send Chargebee PDF to DATEV off: DATEV always receives the e-invoice; the Chargebee PDF only if ticked here.
- Trigger sending in Chargebee on: after the status report has been confirmed, MIDbridgeX triggers sending in Chargebee. If Chargebee rejects the call (e.g. with automatic e-invoicing), the rejection is recorded in the log.
7Attach the e-invoice to invoice emails
For your customers to receive the e-invoice with the invoice email, Chargebee has to attach it.
- In Chargebee, open Settings → Configure Chargebee → Email notifications → Invoice receipt.
- Click EDIT next to Invoice is generated.
- Under Email Options, tick Attach invoice or e-invoice if available and save.
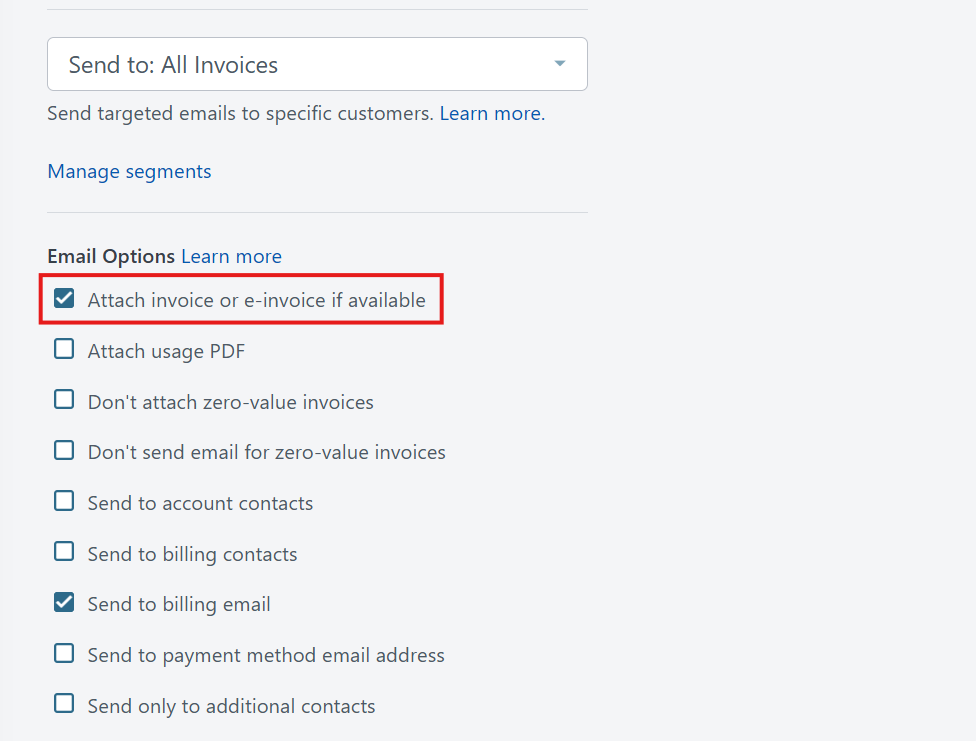
Figure 8 – The e-invoice is attached as soon as it is available; otherwise the regular invoice.
8Testing and verification
On the test site, create an invoice for a customer with a German billing address and check:
| Where | What you should see |
|---|---|
| Chargebee, on the invoice | The e-invoice status changes from “in progress” to successful; the e-invoice can be downloaded. |
| Invoice email | The attachment is the e-invoice (PDF with embedded factur-x.xml). |
| MIDbridgeX, log Chargebee e-invoicing | Submission, status report and retrieval of the document. |
| MIDbridgeX, record tree | The e-invoice is attached to the document (after the next document import). |
Troubleshooting
- Invoice stays “in progress”: Report status to Chargebee is off, or the Chargebee connection is missing or has an invalid API key.
- Status “FAILED” on the invoice: mandatory data is missing (usually phone, email or tax number in the company data, or an incomplete customer address). The reason names the missing field.
- Chargebee reports “PENDING” for the country: seller data is missing; Chargebee lists it in plain text.
- The log in MIDbridgeX stays empty: the key in Chargebee does not match the one generated last, or E-invoicing route is not set to Chargebee E-Invoice.
Contact: MID Technologien GmbH · +49 7551 989 63 64 · info@mid-tech.de · mid-tech.de